Sunday, February 23, 2014

UCS Firmware 2.2(1c) Upgrade Woes - WILL_BOOT_FAULT

This weekend while testing out the new features and compatibility of Cisco UCS firmware 2.2(1c) I ran into an issue where when a blade was upgrading using the auto upgrade feature was showing a very strange status.

I performed the normal steps:

  • Upgrade the Cisco UCS Manager software to version 2.2(1ac) or later. The required server CIMC and BIOS are also included with the download bundle.

  • Use Cisco UCS Manager to upgrade and activate the server CIMC, BIOS and boardcontroller

  • Monitor the firmware upgrade process via FSM at either the blade level (recommended) or from the service profile


Normally, this process is straight forward and very easy! One of the reasons why I love Cisco UCS, but this time after everything was said and done the blade status was showing "WILL_BOOT_FAULT."

Uh, what the heck is WILL_BOOT_FAULT and where did this come from? Ive never seen this before?! So i elected to dig into the problem and see what could be wrong.

I opened an SSH connection to UCSM and proceeded to do the following:

# scope server 2/5 (chassis 2 blade 5)
# scope boardcontroller
# show image (this will list all of the firmware versions)
# activate firmware version.0 force (select the appropriate value from the show image command)
# commit-buffer

This forced the firmware version to the blade in question and everything seemed to progress without any issues. So I thought.... Upon completion the WILL_BOOT_FAULT error came back. DARN! I then decided to move forward with an old trick that I have used before when moving from Pre-2.0.x -> 2.0.x and also when upgrading from 2.0.x -> 2.1.x which is to reset CIMC.

  • In the Navigation pane, click the Equipment tab.

  • On the Equipment tab, expand Equipment > Chassis > Chassis number > Servers, then choose your server.

  • In the Work pane, click the General tab.

  • In the Actions area, click Recover Server.

  • In the Recover Server dialog, click Reset CIMC (Server Controller), then click OK.

  • Wait for CIMC to reboot and for Cisco UCS Manager to do a shallow discovery of the server. This takes two to three minutes.


When all was said and done, the blade came happily back online and the  WILL_BOOT_FAULT error was cleared.

Wednesday, January 15, 2014

New Training Course - VMware Virtual SAN: Deploy and Manage

This training course focuses on deploying and managing a software-defined storage solution with VMware Virtual SAN 5.5. This course looks at how Virtual SAN is used as an important component in the VMware software-defined data center. The course is based on VMware ESXi 5.5 and VMware vCenter Server 5.5.

By the end of the course, you should be able to meet the following objectives:

  • Define the key components of a software-defined data center

  • Identify benefits of software-defined storage solutions

  • Compare and contrast disk types and storage technologies

  • Explain file, block, and object-oriented storage

  • Identify Virtual SAN requirements, use cases, and architecture components.

  • Plan and design a Virtual SAN deployment

  • Configure Virtual SAN clusters

  • Identify benefits of storage policy-based management

  • Scale a Virtual SAN deployment based on storage needs

  • Monitor Virtual SAN

  • Troubleshoot Virtual SAN

  • Identify the integration of Virtual SAN with the VMware product portfolio


VMware Virtual SAN: Deploy and Manage Training Course

Friday, January 10, 2014

Cisco UCS Boot from SAN Troubleshooting

So, first let me define some terms….the Cisco VIC is also called Palo card/adapter. The current generation of Palo is the VIC-1240 and VIC-1280. The VIC-1240 is a built-in option on the M3 blades.

The VIC itself will show you if zoning and LUN masking are correct however the command LUNLIST is a very powerful debugging tool and one that should always be used when troubleshooting a boot from SAN problem. There are prerequisites that must be met for the VIC to show success during POST, and when POST does not show you what you expect, you don’t always know where to start!? Is the problem in the profile, the Fabric Interconnect, the upstream FC switch, or the array itself? It’s this kind of thing that makes san engineer frustrated  with boot from SAN and why many people tend to stay away from using non-persistent storage.

Have no fear though, debugging boot from SAN isn't that hard or complex if you know the general basics of how HBAs work, switch zoning, and switch masking.

Cisco UCS certainly makes boot from SAN tremendously easier but I believe there is always room for improvement, and this area is no different. So with  UCS 2.0 Cisco introduced LUNLIST.

LUNLIST only works prior to the OS HBA driver loading. Once the driver loads, the VIC BIOS is no longer in control and will not return valid data.

To get to the command, you need to gain access to the UCS CLI and run the following:


  • connect: connects to the VICs management processor

  • adapter: the chassis/blade/interface card (example: connect adapter 1/1/1 will connect you to chassis 1, blade 1, adapter 1)

  • attach-fls: attaches to the fabric login service of the adapter

  • vnic: displays the vnic adapters for the Palo


Once you run lunlist, you see output similar to the below. This one is from a server where the end-to-end configuration is correct and the server can boot from SAN:

Now let’s break it apart and describe what you are seeing:
Screen Shot 2014-01-10 at 10.21.43 AM


  1. Incorrect LUN masking:

    Here is the LUNLIST output from a server that is having an issue with incorrect LUN masking. The host has not been allowed access to the assigned LUN. The same problem would likely result if the host is not setup in the array at all, or if it was created on the array but someone mis-typed the host’s WWPN. Zoning is correct because the Nameserver Query Response succeeds (line 11) and returns a WWPN target that matches the WWPN target in the boot policy (line 5). The HBA successfully logged into the fabric and was able to see that a LUN of ID 0×00 is visible (line 9). But when the LUN is queried for additional information, it fails with “access failure” (line 7).


  2. Incorrect Zoning:

    The host is not zoned correctly. It is either in a zone by itself or not zoned at all. This is an easier one to troubleshoot because the host cannot see a LUN nor can it see any available WWPN targets. Look at lines 8 and 9 and notice that there is no response returned for either of these queries. Note that the PLOGI is unsuccessful (fc_id in line 5 is 0×000000) because the host was unable to successfully establish a session with the target.


  3. Incorrect SAN Boot Target in the boot policy:

    You can clearly see that the WWPN configured in the boot policy (line 5) does not match the available target found on the fabric (line 10). In this situation, the PLOGI (line 5) is once again unsuccessful because a session cannot be established between the host and the target.
    Screen Shot 2014-01-10 at 10.49.30 AM


  4. Incorrect LUN ID in the boot policy

    You can see the incorrect LUN ID into the boot policy for the server (line 7) and it does not match the LUN ID found on the fabric (line 9).
    Screen Shot 2014-01-10 at 11.56.21 AM


  5. This example displays a properly configured host that has access to multiple LUNs presented.


6. When you run LUNLIST and the OS is up and running with the driver for the VIC loaded [which means LUNLIST won’t work] you will see the following:

Monday, January 6, 2014

Performance issues with VMware Fusion and OSX Mavericks App Nap

I recently upgraded to OSX 10.9.1 and while most of the upgrades to OSX are welcomed I have been noticing some strange and inconsistent performance issues with VMware Fusion 6.

I knew the issues probably had something to do with Maverick’s as I had no issues with my Mac when using Mountain Lion. I dug a little deeper and looked at the newly  refreshed Activity Monitor in OS X. Nothing exceptional in the CPU and Memory tabs. CPU was at a reasonable level before and after running a virtual machine in VMWare Fusion and I have plenty of room with 16GB of memory.

Nothing seemed to be pegging either metric.  I

looked at Disk and Network… again nothing out of the ordinary.

Knowing that Energy was a new tab I haven’t seen before in Activity Monitor I selected it and noticed the “App Nap” column was listed and indicated “Yes” in the row defining VMWare Fusion.

App Nap is the new feature in Mavericks that allows users, thankfully, to allow OSX to put to sleep applications consuming excessive amounts of your limited battery power.  A great feature for laptop users but I’m using a desktop and plugged into AC.  Not as big of an issue at my desk.  Activity_Monitor__Applications_in_last_8_hours_


A quick scan of Apple’s support site led me to how to disable this feature on an app-by-app basis…  Here’s what I did:

1.  Open a Finder window and navigate to your Applications Folder

2.  Locate VMware Fusion, right click and select “Get Info”

3.  In the “General:” section of the dialog box you will see a checkbox for “Prevent App Nap”.  Make sure this is unchecked.

VMware Fusion

I terminated and restarted VMWare Fusion and launched my Windows virtual machines and everything returned back to normal. No more performance loss or stuttering.

Hope this helps!

Wednesday, December 18, 2013

ESXi 5.5 with PowerPath 5.8/5.9 – Inaccessible Local Datastores

After upgrading to ESXi version 5.5 and installing the current multipathing driver from EMC (PowerPath/VE 5.8/5.9) I encountered a problem with the local storage. EMC PowerPath claims the local storage and makes it inaccessible.


The ESXi Host is then unable to boot after trying claim the local devices.


It boots one last time after installing the driver but can’t access the local VMFS datastore. After a second reboot, an error message “No hypervisor found” is displayed in the VMware Hypervisor Recovery mode.


From now on, the ESXi Host does not boot and needs to be reinstalled.


no-hypervisor-found


The main cause for that issue can be found after the first (and last) reboot next to the PowerPath 5.8/5.9 installation in /var/log/vmkernel.log:


ALERT: PowerPath:Could not claim path vmhba1:C0:T0:L1. Status : Failure
WARNING: ScsiPath: 4693: Plugin ‘PowerPath’ had an error (Failure) while claiming path ‘vmhba1:C0:T0:L1′. Skipping the path.
ScsiClaimrule: 1362: Plugin PowerPath specified by claimrule 290 was not able to claim path vmhba1:C0:T0:L1. Busy
ScsiClaimrule: 1594: Error claiming path vmhba1:C0:T0:L1. Failure.

How resolve the situation?
DO NOT REBOOT
the ESXi Host in that situation! Disable the claimrule for PowerPath, reclaim the local device, remove PowerPath, set the bootstate to 0 and reboot the ESXi Host:


  1. Identify the local Device with the vSphere Client. The local devices can be found in the Configuration Tab from the affected ESXi Host under Hardware -> Storage Adapters -> Pathslocal-dead

  2. Note the Adapter, Controller, Target and LUN ID (eg. vmhba1:C0:T0:L1)

  3. Open a SSH connection to the ESXi Host

  4. Disable all PowerPath ClaimrulesExample (‘esxcli storage core claimrule list’ output):
    powerpath-claimrules


  5. # List Claimrules (Verification step)
    esxcli storage core claimrule list

    # Remove the Rule
    esxcli storage core claimrule remove --rule 250
    esxcli storage core claimrule remove --rule 260
    esxcli storage core claimrule remove --rule 270
    [...]

    # Reload the path claiming rules into the VMkernel:
    esxcli storage core claimrule load

    # Unclaim the affected device (eg. vmhba1:C0:T0:L1)
    esxcli storage core claiming unclaim -t location -A vmhba1 -C 0 -T 0 -L 1

    # Perform a rescan for the changes to take effect.
    esxcli storage core claimrule run


  6. The local disk should now appear active:local-active

  7. Remove PowerPath
    esxcli software vib remove -n powerpath.cim.esx -n powerpath.lib.esx -n powerpath.plugin.esx


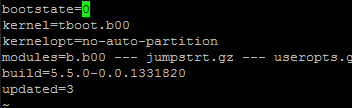
  8. Edit /bootbank/boot.cfg and set bootstate=0esxi-bootcfg-bootstate

  9. Reboot the ESXi Host


The ESXi Host should now reboot and come up completely without PowerPath.


Fix / Workaround
To keep PowerPath away from the local storage you have to create a custom claimrule prior to install PowerPath 5.9.


1. Open a SSH connection to the ESXi Host


2. Create a Claimrule for the local devices to use the NMP multipathing driver. In that example, the rule is created for vmhba1:C0:T0:L1


esxcli storage core claimrule add --rule 110 -t location -A vmhba1 -C 0 -T 0 -L 1 -P NMP

3. Reclaim the affected device


esxcli storage core claiming unclaim -t location -A vmhba1 -C 0 -T 0 -L 1
esxcli storage core claimrule run

4. Install PowerPath/VE 5.8/5.9


esxcli software vib install -d /vmfs/volumes//EMCPower.VMWARE.5.9.b160.zip

5. Reboot the ESXi Host
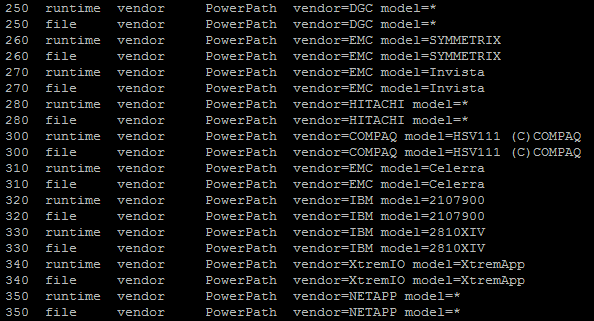
6. Doublecheck the Claimrules. They have to look like this:


~ # esxcli storage core claimrule list
Rule Class Rule Class Type Plugin Matches
---------- ----- ------- --------- --------- ---------------------------------------
MP 0 runtime transport NMP transport=usb
MP 1 runtime transport NMP transport=sata
MP 2 runtime transport NMP transport=ide
MP 3 runtime transport NMP transport=block
MP 4 runtime transport NMP transport=unknown
MP 101 runtime vendor MASK_PATH vendor=DELL model=Universal Xport
MP 101 file vendor MASK_PATH vendor=DELL model=Universal Xport
MP 110 runtime location NMP adapter=vmhba1 channel=0 target=0 lun=1
MP 110 file location NMP adapter=vmhba1 channel=0 target=0 lun=1
MP 250 runtime vendor PowerPath vendor=DGC model=*
MP 250 file vendor PowerPath vendor=DGC model=*
MP 260 runtime vendor PowerPath vendor=EMC model=SYMMETRIX
MP 260 file vendor PowerPath vendor=EMC model=SYMMETRIX
MP 270 runtime vendor PowerPath vendor=EMC model=Invista
MP 270 file vendor PowerPath vendor=EMC model=Invista
MP 280 runtime vendor PowerPath vendor=HITACHI model=*
MP 280 file vendor PowerPath vendor=HITACHI model=*
MP 290 runtime vendor PowerPath vendor=HP model=*
MP 290 file vendor PowerPath vendor=HP model=*
MP 300 runtime vendor PowerPath vendor=COMPAQ model=HSV111 (C)COMPAQ
MP 300 file vendor PowerPath vendor=COMPAQ model=HSV111 (C)COMPAQ
MP 310 runtime vendor PowerPath vendor=EMC model=Celerra
MP 310 file vendor PowerPath vendor=EMC model=Celerra
MP 320 runtime vendor PowerPath vendor=IBM model=2107900
MP 320 file vendor PowerPath vendor=IBM model=2107900
MP 330 runtime vendor PowerPath vendor=IBM model=2810XIV
MP 330 file vendor PowerPath vendor=IBM model=2810XIV
MP 340 runtime vendor PowerPath vendor=XtremIO model=XtremApp
MP 340 file vendor PowerPath vendor=XtremIO model=XtremApp
MP 350 runtime vendor PowerPath vendor=NETAPP model=*
MP 350 file vendor PowerPath vendor=NETAPP model=*
MP 65535 runtime vendor NMP vendor=* model=*
~ #

Reboot the ESXi Host again to make sure it can boot. This workaround persists a reboot.

Wednesday, November 13, 2013

How to set Windows MTU lower than 1500 on VMs


While there exists some registry hack I found online I feel the best method to configure a custom MTU was not in the driver (or registry), but rather by using the command line utility netsh.


You will first need to figure out the index number of your nic with the command netsh interface ipv4 show interfaces


After finding the index number you will need to use it in the next command netsh interface ipv4 set subinterface "16" mtu=1340 store=persistent

Disclaimer: The size of 1340 is used as an example here. 

Tuesday, November 5, 2013

Now available: OpenStack+vSphere and vCAC 6.0 Labs!

Got Automation? Fresh from their debut performances in VMworld Europe, VMware has released two new labs in the Software-Defined Datacenter catalog, both specifically focused on cloud automation solutions.

http://labs.hol.vmware.com/

HOL-SDC-1320 – OpenStack on VMware vSphere


OpenStack is a cloud management platform that enables self-service cloud provisioning and automation. What does that mean for you? This lab provides a basic overview of OpenStack and how it can be used with vSphere to provide cloud users access to compute and storage resources.

Enroll in HOL-SDC-1320

HOL-SDC-1321 – vCloud Automation Center (vCAC) 6.0 from A to Z


VMware vCloud Automation Center (vCAC) version 6 has arrived! Explore how vCAC 6, vCAC Application Provisioning, vCAC Business Management, vCenter Orchestrator (vCO), and VMware vCloud Networking and Security (vCNS) integrate and accelerate successful cloud deployments.

Enroll in HOL-SDC-1321